Run script
Anatomy
At the top of all the Python test scripts (located in parflow/test/python/) are something similar to the following lines:
from parflow import Run
test_run = Run("test_run", __file__)
These lines import the Run class from the parflow module and create a new Run object called test_run (or whatever you want the run name to be). All the key/value pairs are set on this object.
Setting keys
The basic way to set keys in a Python script is assigning a variable to the Run object that you initialize at the beginning of your model, like shown:
from parflow import Run
test_run = Run("test_run", __file__)

# Now that the Run object is initialized, you can set keys:
test_run.Process.Topology.P = 1
test_run.Process.Topology.Q = 1
test_run.Process.Topology.R = 1
Pretty simple! You can also create your user-defined keys, as shown below. Note that the following excerpts of code assume that you have already instantiated the Run object test_run.
test_run.GeomInput.Names = 'domain_input background_input'

# Defining the InputType and GeomName of the 'domain_input' that you already defined:
test_run.GeomInput.domain_input.InputType = 'Box'
test_run.GeomInput.domain_input.GeomName = 'domain'
Python PFTools requires that you define the user-defined input names (e.g., GeomInput.Names, Cycle.Names, Phase.Names) before you use them as part of a key name.
Valid key names
As a general rule, each “token” within a key name (e.g. GeomInput or domain_input in the prior example) must be a valid Python variable name. Information about valid Python variable names is here. This means that you can’t use hyphens in your user-defined variables or use integers as tokens. However, if you absolutely must use non-Pythonic key names, there is a way. You can specify the token in brackets without the preceding decimal, as in the following example:
test_run.Patch['x-lower'].BCPressure.Type = 'FluxConst'
Specifying integer tokens (e.g., setting Cell.0.dzScale.Value) can be done in multiple ways. The preferred method is to use the token’s “prefix”, which is a character (alphanumeric or “_”) that will always prefix that token. Right now, the prefixes for all the integer tokens is an underscore (“_”).
However, as shown in the following example, these integer tokens can be set in multiple ways:
prefix.dzScale.nzListNumber = 6

# Here are four different ways to set integer values as part of a key name:
# 1) no bracket, no quotes, underscore
prefix.Cell._3.dzScale.Value = 1.000

# 2) bracket, quotes, underscore, no preceding decimal
prefix.Cell['_0'].dzScale.Value = 1.0

# 3) bracket, quotes, no underscore, no preceding decimal
prefix.Cell['1'].dzScale.Value = 1.00

# 4) bracket, no quotes, no underscore, no preceding decimal
prefix.Cell[2].dzScale.Value = 1.000
These will all write the key in the ParFlow database file in the correct format.
Setting keys and values with pfset()
The pfset() method does more than just allow you to set an individual key. You can set groups of keys at a time using the hierarchical_map, flat_map, or yaml_content arguments in the pfset method, as shown in the test file $PARFLOW_SOURCE/test/python/new_features/pfset_test/pfset_test.py:
#-----------------------------------------------------------------------------
# pfset: hierarchical_map
#-----------------------------------------------------------------------------

pfset_test.pfset(hierarchical_map={
    'SpecificStorage': {
        'Type': 'Constant',
        'GeomNames': 'domain',
 }
})

constOne = {'Type': 'Constant', 'Value': 1.0}

pfset_test.Phase.water.Density.pfset(hierarchical_map=constOne)
pfset_test.Phase.water.Viscosity.pfset(flat_map=constOne)

#-----------------------------------------------------------------------------
# pfset: flat_map
#-----------------------------------------------------------------------------

pfset_test.pfset(flat_map={
    'Phase.Saturation.Type': 'VanGenuchten',
    'Phase.Saturation.GeomNames': 'domain',
})

pfset_test.Phase.pfset(flat_map={
    'RelPerm.Type': 'VanGenuchten',
    'RelPerm.GeomNames': 'domain',
})

#---------------------------------------------------------
# pfset: yaml_content
#---------------------------------------------------------

pfset_test.Geom.source_region.pfset(yaml_content='''
Lower:
    X: 65.56
    Y: 79.34
    Z: 4.5
Upper:
    X: 74.44
    Y: 89.99
    Z: 5.5
''')

pfset_test.Geom.concen_region.pfset(yaml_content='''
Lower:
    X: 60.0
    Y: 80.0
    Z: 4.0
Upper:
    X: 80.0
    Y: 100.0
    Z: 6.0
''')
Or, if you have a yaml file, you can use the yaml_file argument to read in a yaml file to set the keys:
#---------------------------------------------------------
# pfset: yaml_file
#---------------------------------------------------------

pfset_test.pfset(yaml_file='./BasicSettings.yaml')
pfset_test.pfset(yaml_file='./ComputationalGrid.yaml')
pfset_test.Geom.pfset(yaml_file='./GeomChildren.yaml')
This can make your run scripts more compact and readable.
Setting keys that aren’t in the library with pfset()
If you want to set a key in the Python script that’s not already in the library, you have two options: 1) add the key to the library (see the documentation on “Contributing keys”) or 2) using the pfset(key, value) method.
pfset(key, value) allows the user to set a key (or token) name at any level with any value. Here are some examples from the test file $PARFLOW_SOURCE/test/python/new_features/pfset_test/pfset_test.py:
# Sets A.New.Key.Test = 'SomeSuperContent'
pfset_test.pfset(key='A.New.Key.Test', value='SomeSuperContent')

# Sets Process.Topology.Random.Path = 5
pfset_test.pfset(key='Process.Topology.Random.Path', value=5)

# Sets Process.Topology.Random.PathFromTopology = 6
pfset_test.Process.Topology.pfset(key='Random.PathFromTopology', value=6)

# Sets Process.Topology.P = 2
pfset_test.pfset(key='Process.Topology.P', value=2)

# Sets Process.Topology.Q = 2
pfset_test.Process.pfset(key='Topology.Q', value=3)

# Sets Process.Topology.R = 2
pfset_test.Process.Topology.pfset(key='R', value=4)

# Sets Process.Topology.Seb = 2
pfset_test.Process.Topology.pfset(key='Seb', value=5)
As you can see from the many examples here, you can use pfset(key, value) at any level of token within your key, and even set keys that already exist.
Key validation
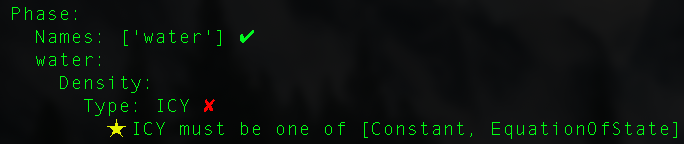
An objective of the Python PFTools is to improve the error messages before and during a ParFlow run. The first step of this is validation.
If you call the validate() method on your Run object with incorrect values set to a key, you will get a range of error messages like the following:
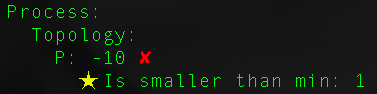
You will also get a warning if you set a key multiple times, as shown:
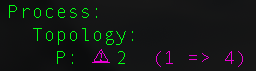
Here, Process.Topology.P was set three times: first to 1, then to 4, and finally to 2. Note: if you use the pfset() method to define a new key name, it
will not throw an error in the validation.
Methods
Other methods that can be called on a Run object are shown below:
from parflow import Run

# Instantiate a Run object
test_run = Run("test_run", __file__)

# Distribute a ParFlow binary file associated with a run
# P, Q, and R optional arguments override Process.Topology values
test_run.dist('test_slopes.pfb')

# Validate the values set to the keys of the Run object
test_run.validate()

# Write out key/value pairs to a file
test_run.write(file_format='pfidb')
test_run.write(file_format='yaml')
test_run.write(file_format='json')

# Write pfidb file and run ParFlow in the same directory as the script, skipping validation
test_run.run(skip_validation=True)

# Clone the run into a new Run object
cloned_run = test_run.clone('cloned_run')
Full API
runobj.validate(indent=1, verbose=False, enable_print=True)- validates the values set to each key. Validation checks for:
- Data type (int, float, string)
- Appropriate range of value (e.g. saturation can’t be less than zero!)
- File availability
- Duplicate values
- Necessary module(s) installed
- Key exists in working version of ParFlow
The three optional arguments deal with printing the validation messages.
indent=1is the tab length for each level of the hierarchy. The number of spaces that each level is indented is two timesindent(so default is two spaces).verbose=False, if set toTrue, will print all key/value pairs in the run. Otherwise,validatewill only print the key/value pairs with errors and their respective error messages. The runtime argument--validation-verboseis equivalent to settingverbose=True.enable_print=Truedefaults to printing all the validation messages. If set toFalse, no validation messages will be printed.
runobj.write(file_name=None, file_format='pfidb')- this will write the set of key/value pairs associated with therunobjin a specified format. The defaultfile_nameis the name of theRunobject, and the default format is the ParFlow databse format. Other supported formats include .yaml, .yml, and .json.runobj.write_subsurface_table(file_name=None)- this will write out a table with the subsurface properties assigned to each subsurface unit. If a file name is not specified, it will default to a .csv file using the name you set to yourRunobject at the top of the script, e.g., default_richards_subsurface.csv. More information is in the subsurface property tutorial.runobj.run(working_directory=None, skip_validation=False)- this calls thewrite()method to write the set of key/value pairs to a ParFlow binary file. It also calls thevalidate()method ifskip_validation=False. Ifskip_validation=True, it will skip the validation. This is equivalent to the--skip-validationruntime argument. Finally, the method will attempt to execute ParFlow. Ifworking_directoryis not given,run()defaults to writing all files in the directory of the Python script. Theworking_directoryargument is equivalent to the--working-directoryruntime argument.runobj.dist(pfb_file)- distributes a given ParFlow binary file using theparflowiolibrary with the givenProcess.Topology.[P/Q/R]values. The topology that thedist()method uses can be overwritten as in the above example. This will be covered in more detail in Tutorial 4.runobj.clone(name)- clones the objectrunobjto a new objectname. This makes it easy to develop ensembles of runs without having to reset all the keys and values.
Example
The default_richards.py test is a straightforward example of a run script. If you’d like to explore the other methods, copy this test
to a local directory, and replace the last line (drich.run) with the following lines:
drich_2 = drich.clone('drich_2')
drich_2.Patch.left.BCPressure.alltime.Value = 6.0
drich_2.validate()
drich_2.write(file_format=‘yaml’)
drich_2.run(skip_validation=True)
Execute the script and look at what prints and which output files are created - explore to your heart’s content!